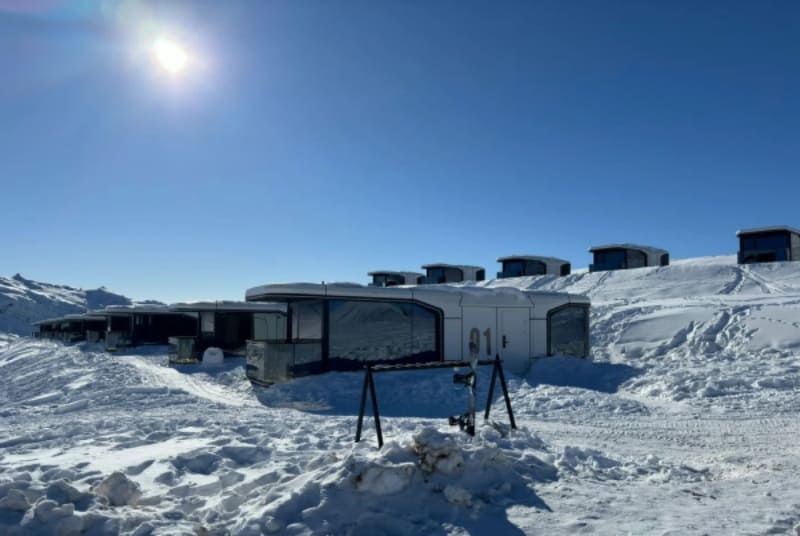
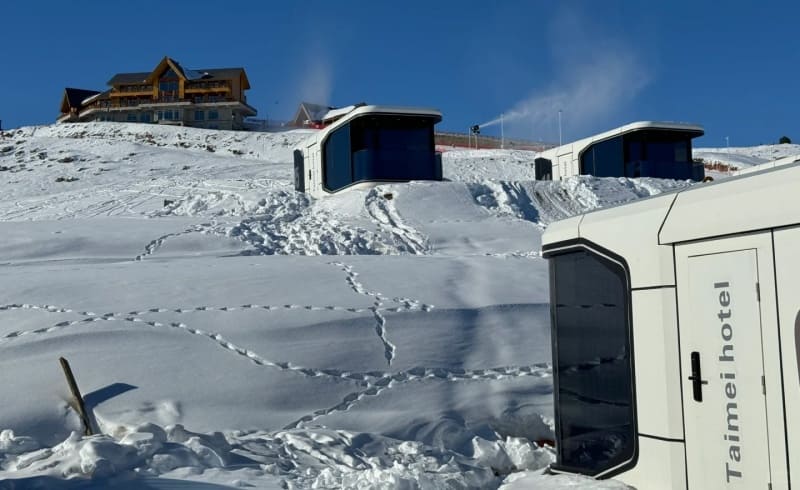
Imagine guests waking up to fresh powder, stepping outside, and heading straight to the slopes. A capsule house village can turn this vision into reality. These compact pods feel like tiny, modern cabins—fast to install, comfortable like hotel rooms, and equipped with good Wi-Fi, efficient heating, and smart layouts. Many mountain destinations already use these winter-ready pods to add new capacity quickly and earn revenue right away.
This guide walks you through the essential steps to plan your capsule house village successfully.
1. Understand Your Resort Concept and Target Guests
Begin by defining your concept and identifying who your village will serve. Your theme, design style, and service level all depend on your preferred guest profiles.
1. Clarify Your Target Demographics
Identify the types of travelers you want to host—for example:
Budget skiers who prioritize slope access over large rooms.
Design-focused couples who want a unique, compact, stylish stay.
Families that need practical layouts, such as bunk-bed pods or rooms with extra space.
Create clear guest profiles. These will guide how you decorate, equip, and price each pod.
2. Decide on Your Key Numbers
Set the business foundations early:
Target nightly rate
Occupancy goals
Peak and shoulder season demand
Year-round or seasonal operation
These numbers determine how many pods you need and your expected revenue.
3. Position Your Capsule Village in the Local Market
Analyze how your offering fits among nearby hotels, condos, and hostels. Look for gaps—budget lodging near lifts, or boutique-style micro accommodations.
Decide whether your village will feel like:
A sleek, modern mini lodge
A stylish pod hotel
A social, hostel-style micro community
This helps shape your brand and guest experience.
2. Choose a Strategic Site Close to Ski Lifts
Location is everything for a ski resort. Select a site that maximizes convenience and remains accessible in winter conditions.
1. Aim for True Ski-In Convenience
Your village should sit within walking distance of gondolas or chairlifts. Being only a few hundred meters from the slopes enhances guest satisfaction dramatically.
2. Ensure Winter Access and Safety
Plan for:
Snowplow routes
Safe drop-off zones
Clear parking areas
Year-round emergency vehicle access
Leave several meters around each pod so plows can operate without blocking doors or walkways.
3. Respect Planning Rules and Mountain Aesthetics
Follow local building codes and alpine design guidelines:
Use pitched roofs for snow shedding
Match the scale of nearby base-area buildings
Choose materials like wood, stone, or metal
Use warm, low-intensity exterior lighting
Good design ensures your village blends into the landscape and secures planning approval.
3. Design the Village Layout and Guest Flow
A well-planned layout ensures efficient operations and a smooth guest experience.
1. Define Capacity and Pod Mix
Start with your peak-night capacity target. Then choose:
Two-person standard pods
Family pods with bunks
Premium pods with enhanced views
This determines how many units to order and how to distribute them.
2. Create a Simple Guest Journey
Map the route guests take:
Arrival
Parking or drop-off
Reception or check-in kiosk
Ski/gear locker area
Pathways to pods
Morning access back to slopes
Keep movement intuitive and avoid forcing guests through storage or vehicle areas.
3. Optimize Pods for Views and Privacy
Stagger pod rows so each unit has a mountain-facing window. Avoid snow-slide zones and roof-shedding areas. Leave space for snow storage and safe walking paths.
4. Build a Welcoming Village Hub
Plan a small central building featuring:
Reception
Lounge
Drying room
Coffee bar or small shop
This warm, social space becomes the daily anchor of your village.
4. Make Pods Safe, Warm, and Efficient to Operate
High-quality construction and efficient back-of-house planning ensure smooth long-term operation.
1. Use Alpine-Ready Structures
Choose units built to meet mountain conditions:
Snow- and wind-load compliance
Steep snow-shedding roofs
Reinforced framing
Compare manufacturers’ snow-load ratings to select the right model.
2. Invest in Proper Insulation, Glazing, and Heating
For guest comfort:
Strong insulation in floors and roofs
Double or triple glazing
Underfloor heating, heat pumps, or infrared heating
Heat-recovery ventilators (HRVs) for fresh air
These features maintain warmth while preventing moisture buildup.
3. Treat Utilities Like a Small Hotel
Plan for:
Water supply and wastewater systems
Power distribution
Laundry and linen storage
Waste handling zones
Keep these tucked behind the hub or in a service shed.
4. Build in Phases to Manage Costs
Begin with a Phase 1 including the central hub and 6–10 pods. Test demand, gather reviews, and expand with more pods—or add amenities like saunas or hot tubs—during Phase 2 or 3.
Conclusion
A capsule house village is an efficient, profitable way to expand your ski resort. By choosing a smart location, designing intuitive guest flow, selecting winter-ready pods, and building in phases, you can create a warm, cozy, and memorable alpine retreat. With the right planning, each ski season becomes a high-value season—boosting guest satisfaction and your resort’s revenue.